A month of Zen
The Corne-ish Zen is a small, 42-key wireless split keyboard. It uses the ZMK firmware, which means, for better and for worse, that it is extremely customisable once you’ve learnt how to configure it. And you need all that configuration: with 42 keys including thumbkeys, both the function and number rows are gone. So how does that work? How do you manage without? And is it actually practical to use such a small keyboard for everyday work? I’ve been using mine everyday for the past month or so in order to find out. It’s been really fun and interesting!
Table of Contents
You cannot buy this keyboard
Let’s get the boring and unfortunate, but important disclaimer out of the way: you cannot buy this keyboard. It was a group buy (a sort of crowdfunding), which finished almost a year ago, and Darryl, the inventor/maker of the Corne-ish Zen boards has stated that he wishes to move on to other things. So unless you find one on the second-hand market, you unfortunately cannot buy this keyboard.
And that is really a shame, because the board is pretty great; especially if you’re on the go a lot!
General overview
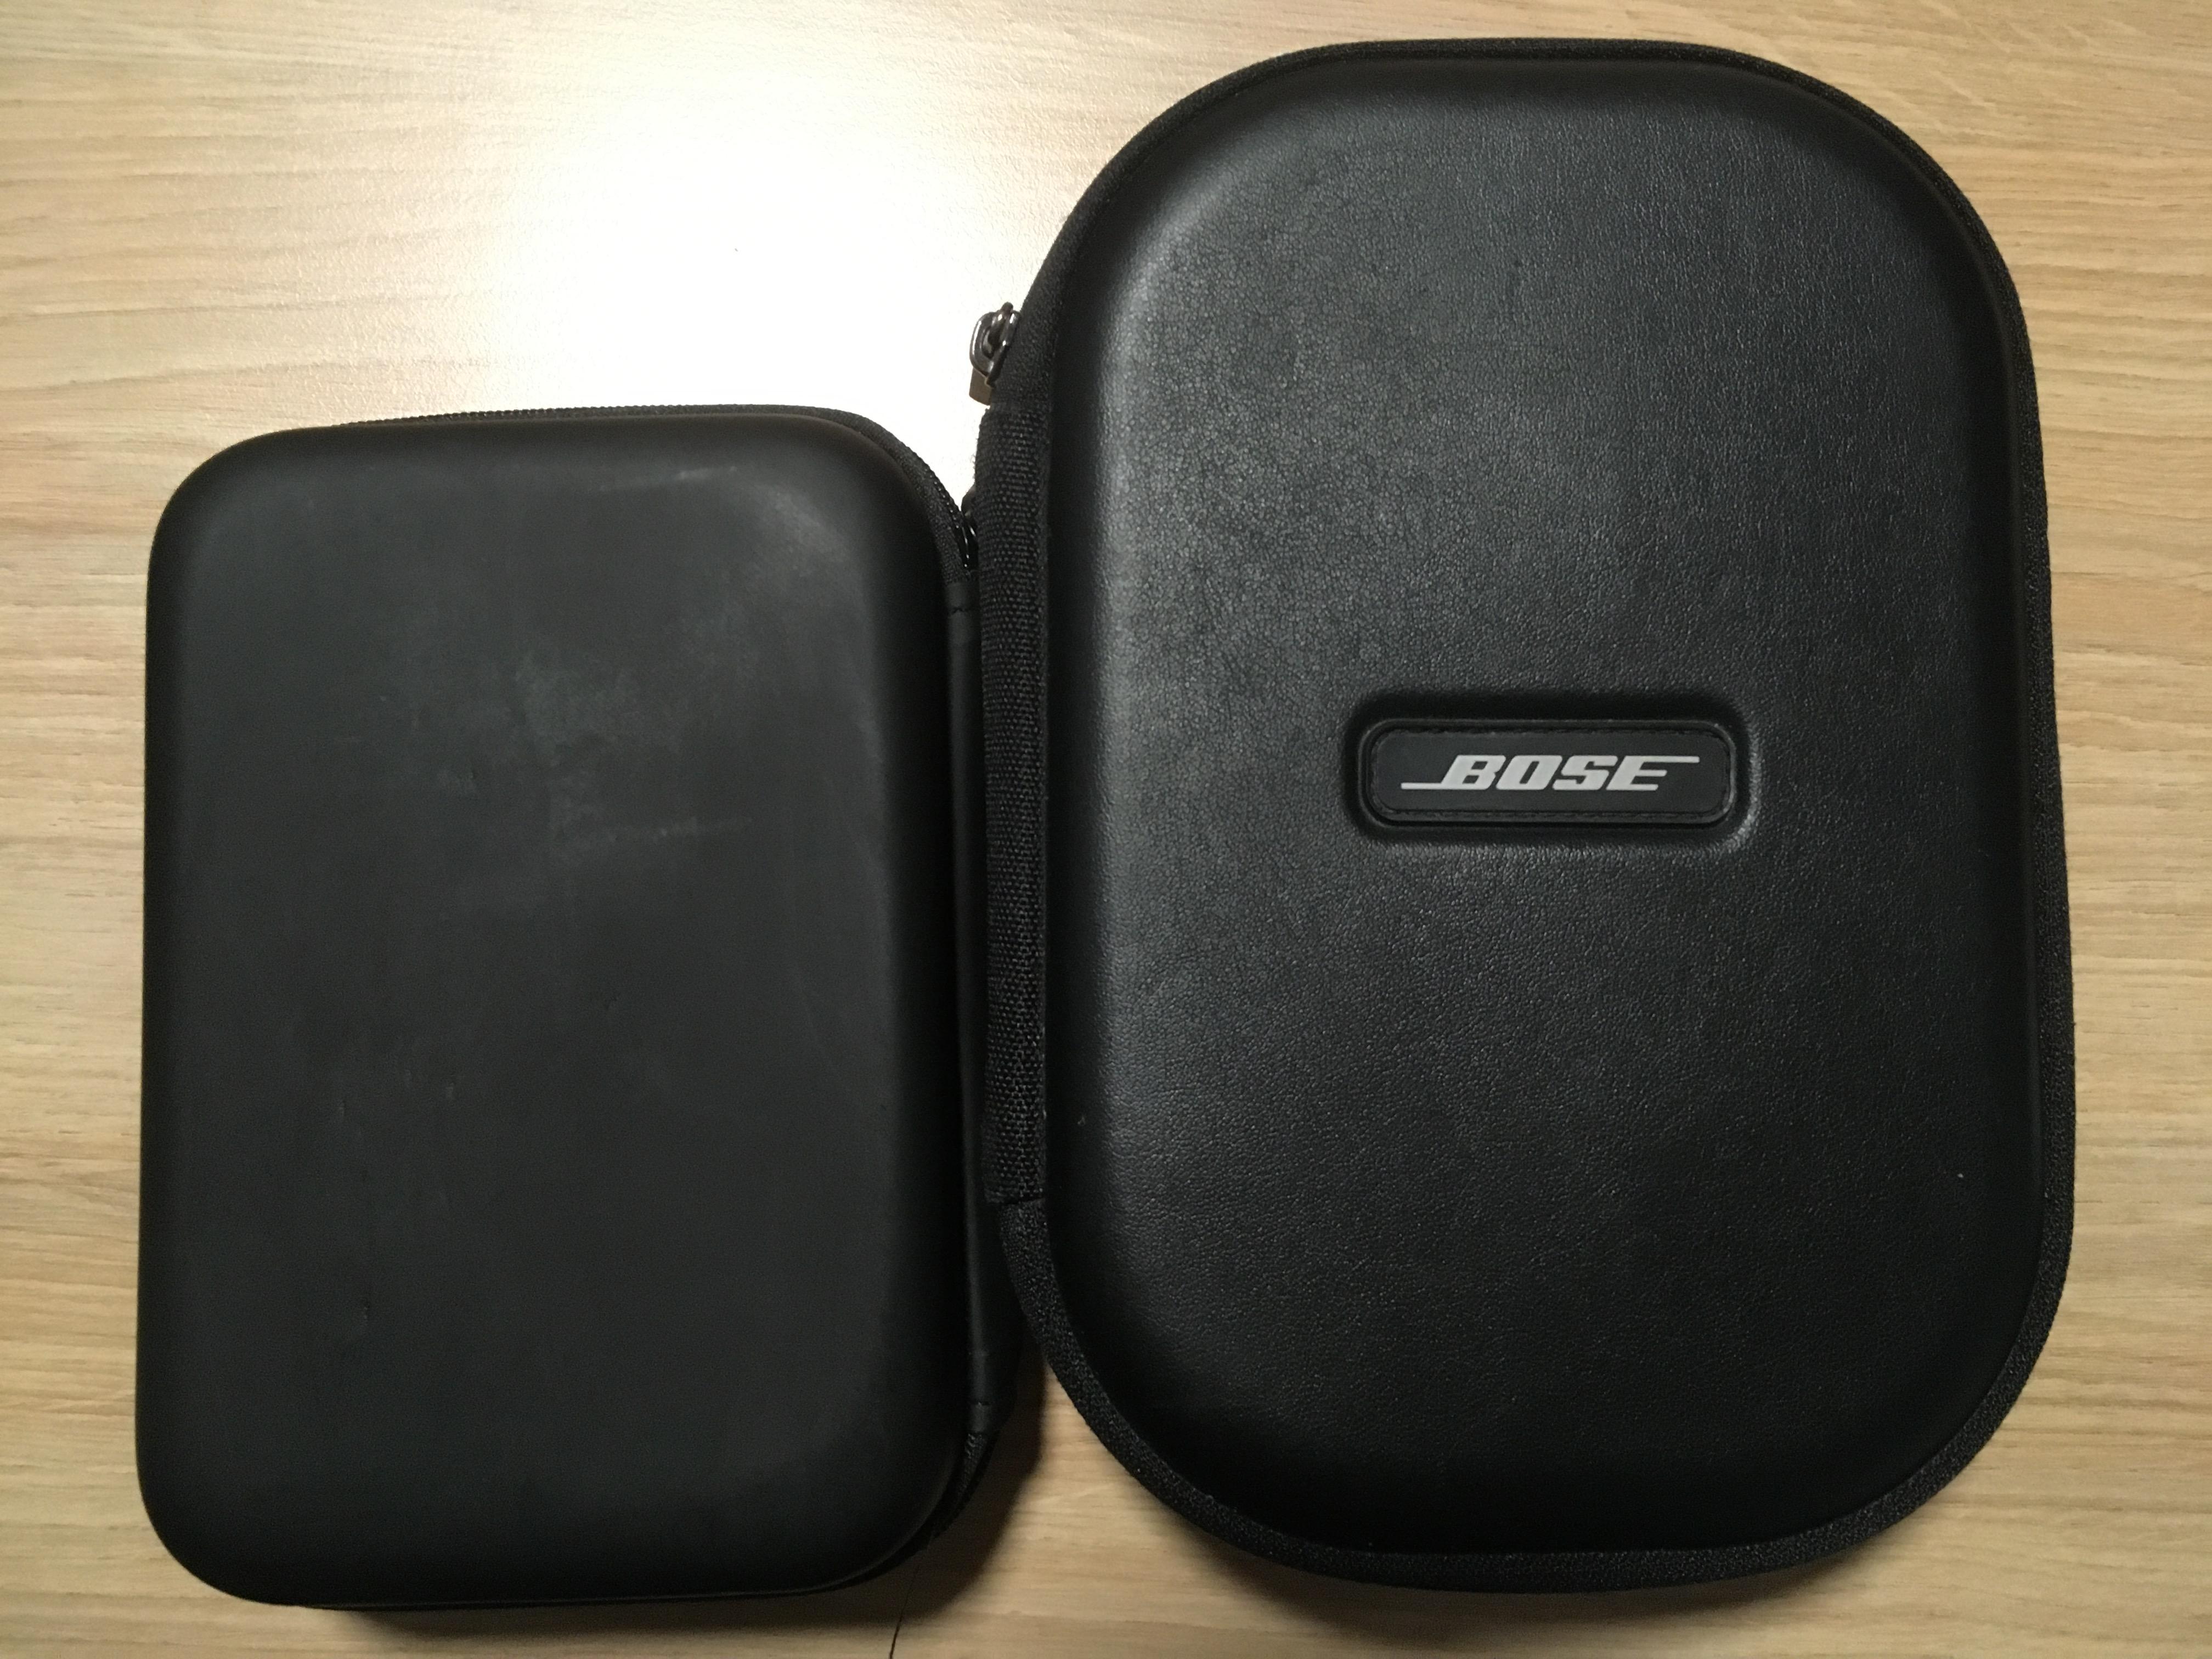
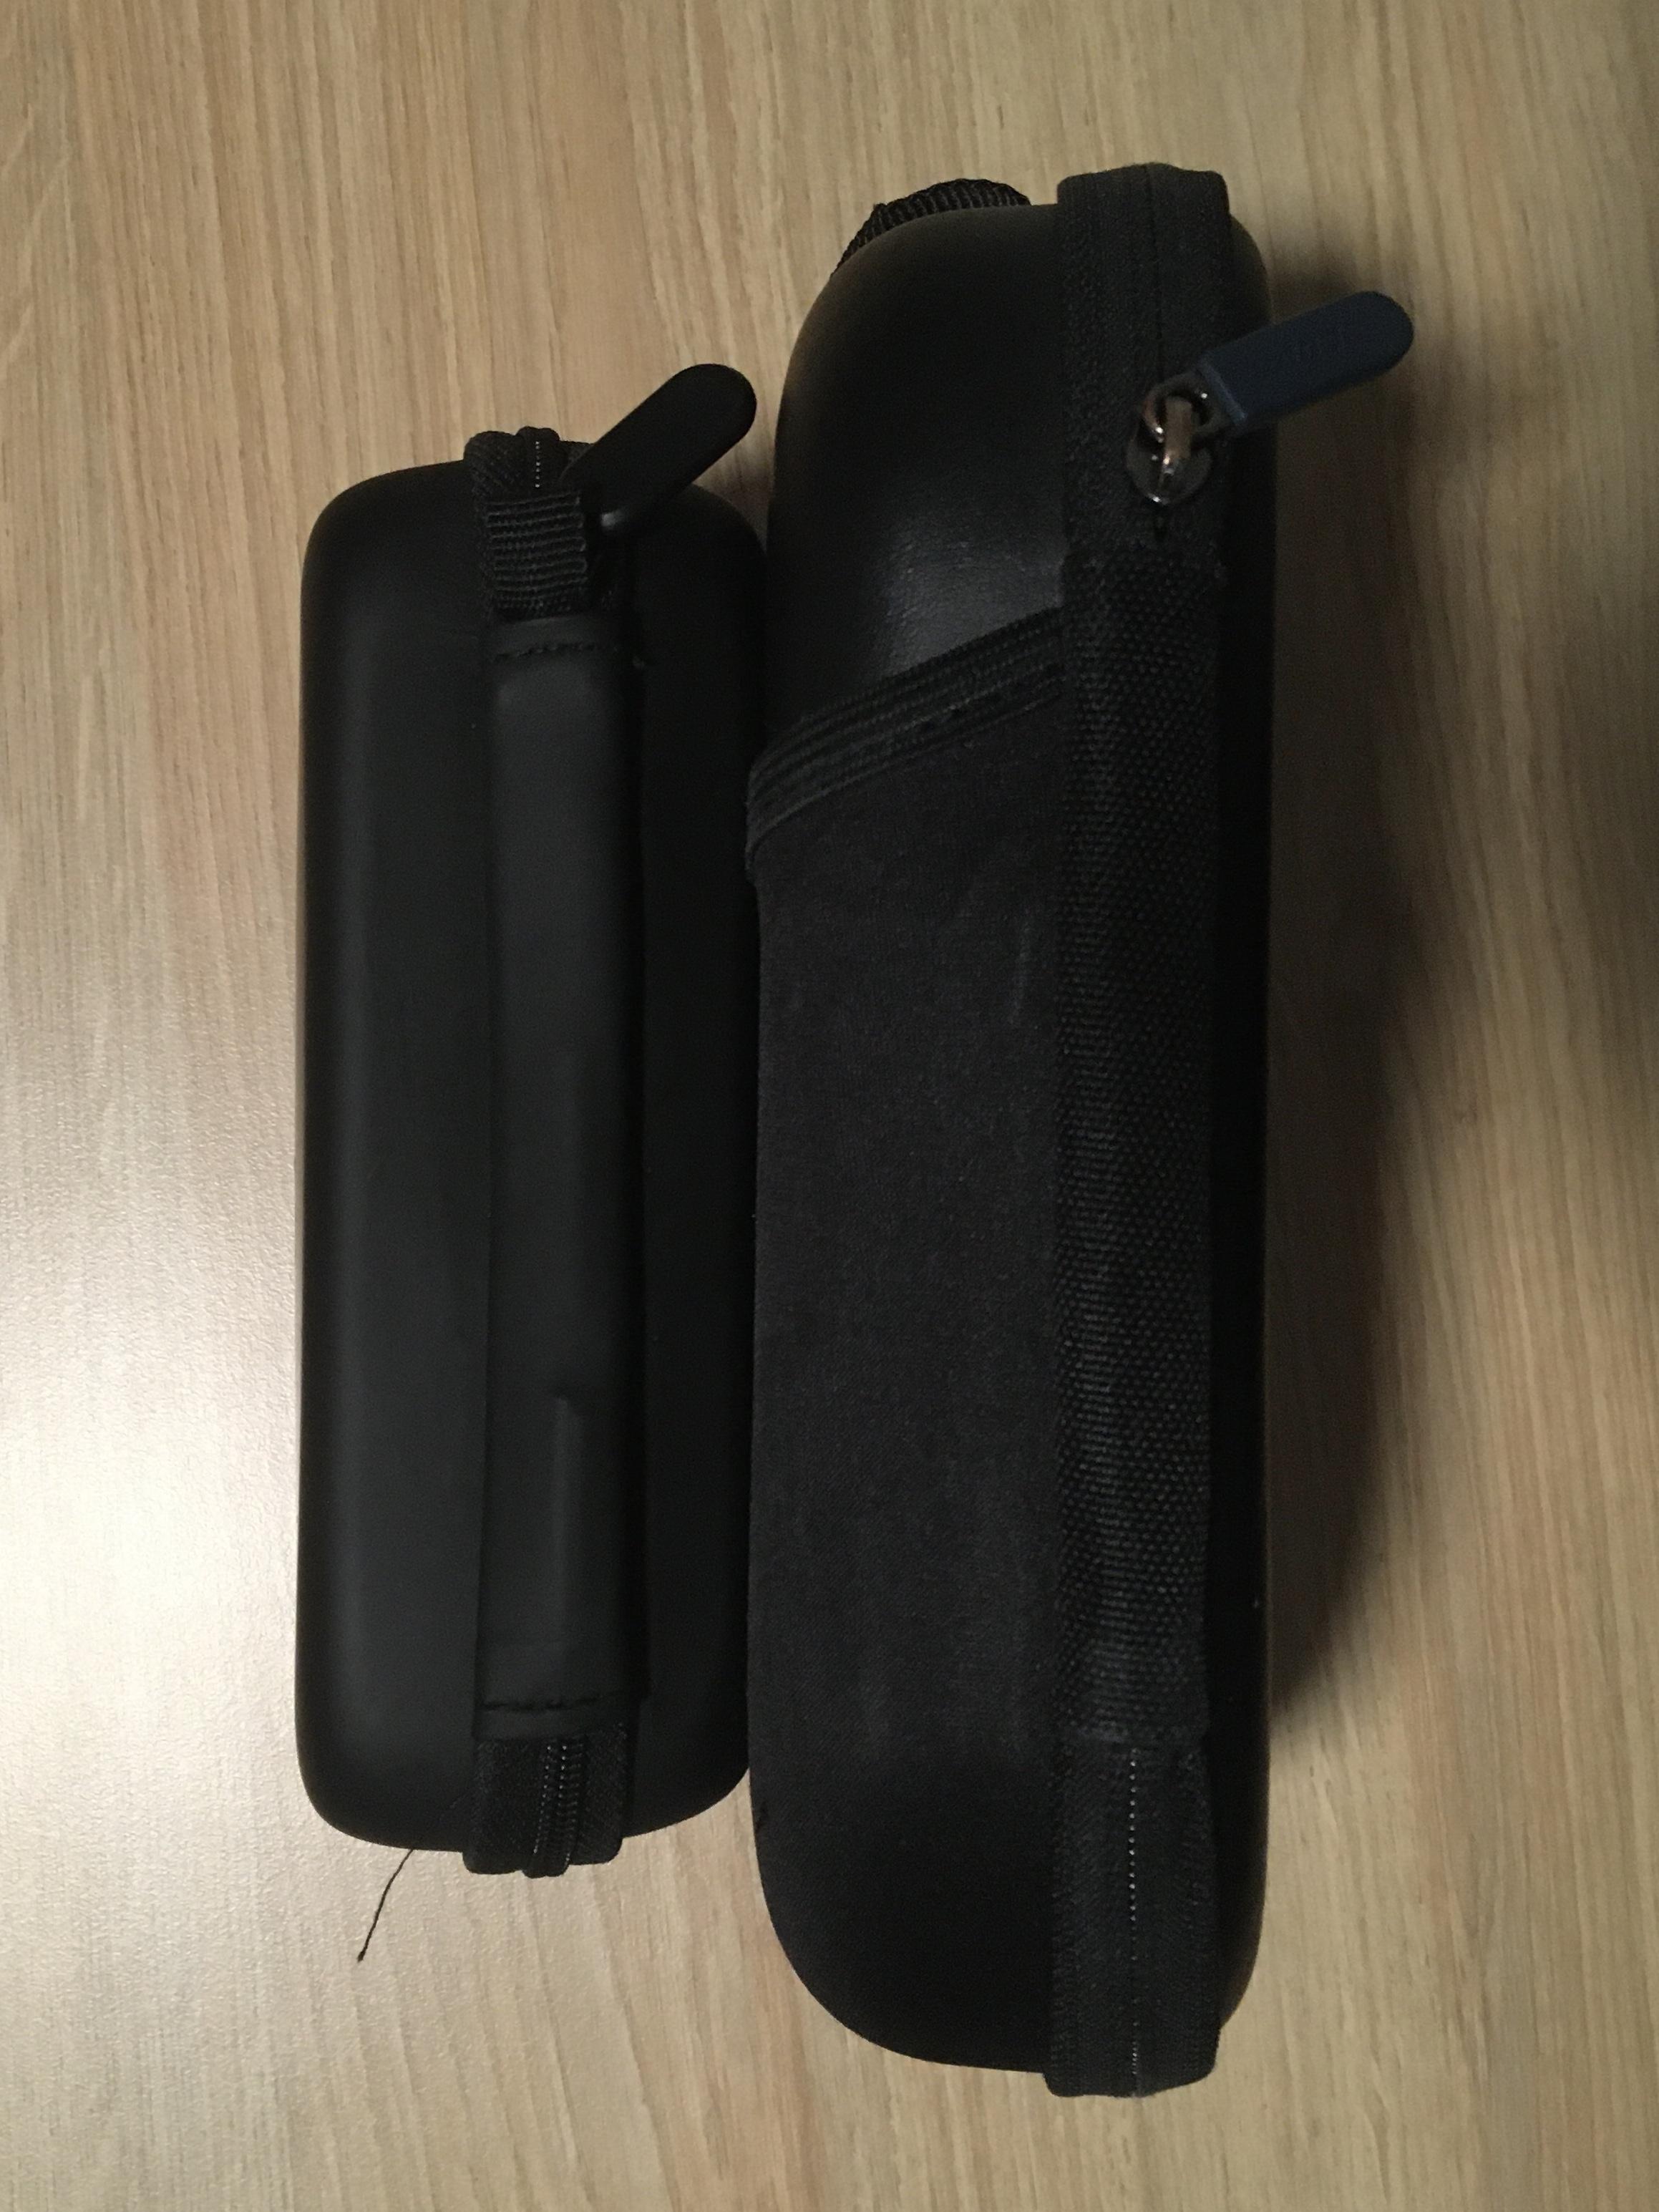
The first thing I noticed was that this keyboard is tiny. I knew it was a low-profile 42-key compact thingy, but I was still surprised at just how small it is! It came in a nice carrying case (superb for taking it with you to work, cafés, or whatnot) and even with the case it takes up less space than the case for my Bose QC-25s:
Each half of the keyboard also has its own little protective fabric bag, making the product feel extremely premium and thought-through:

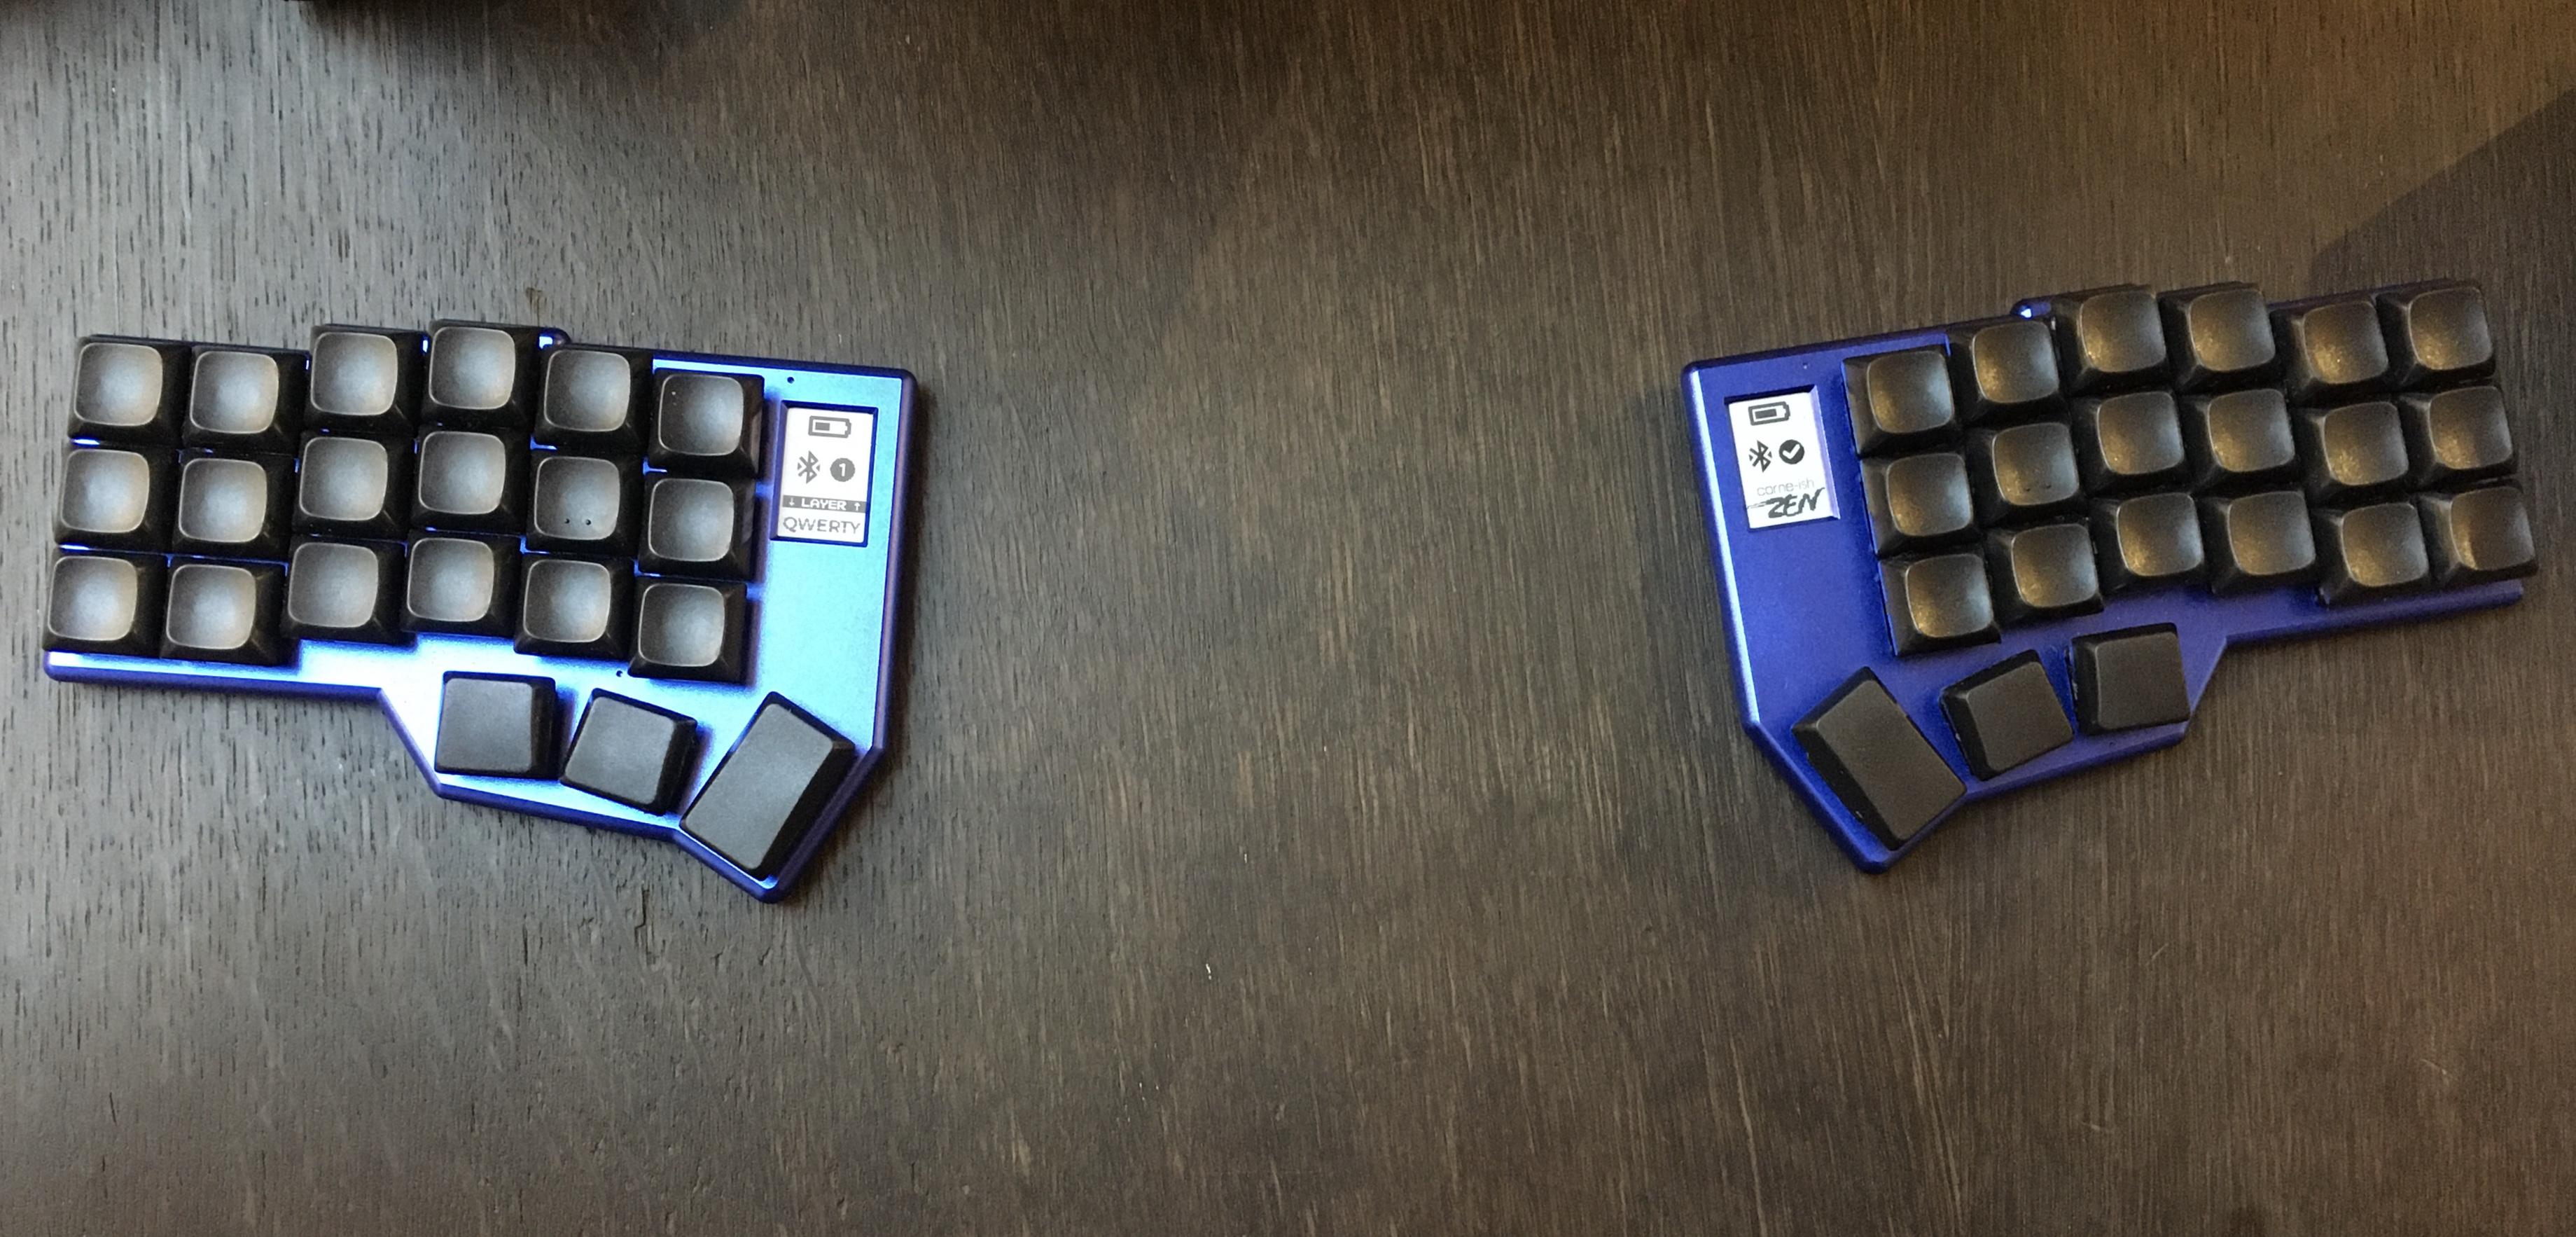
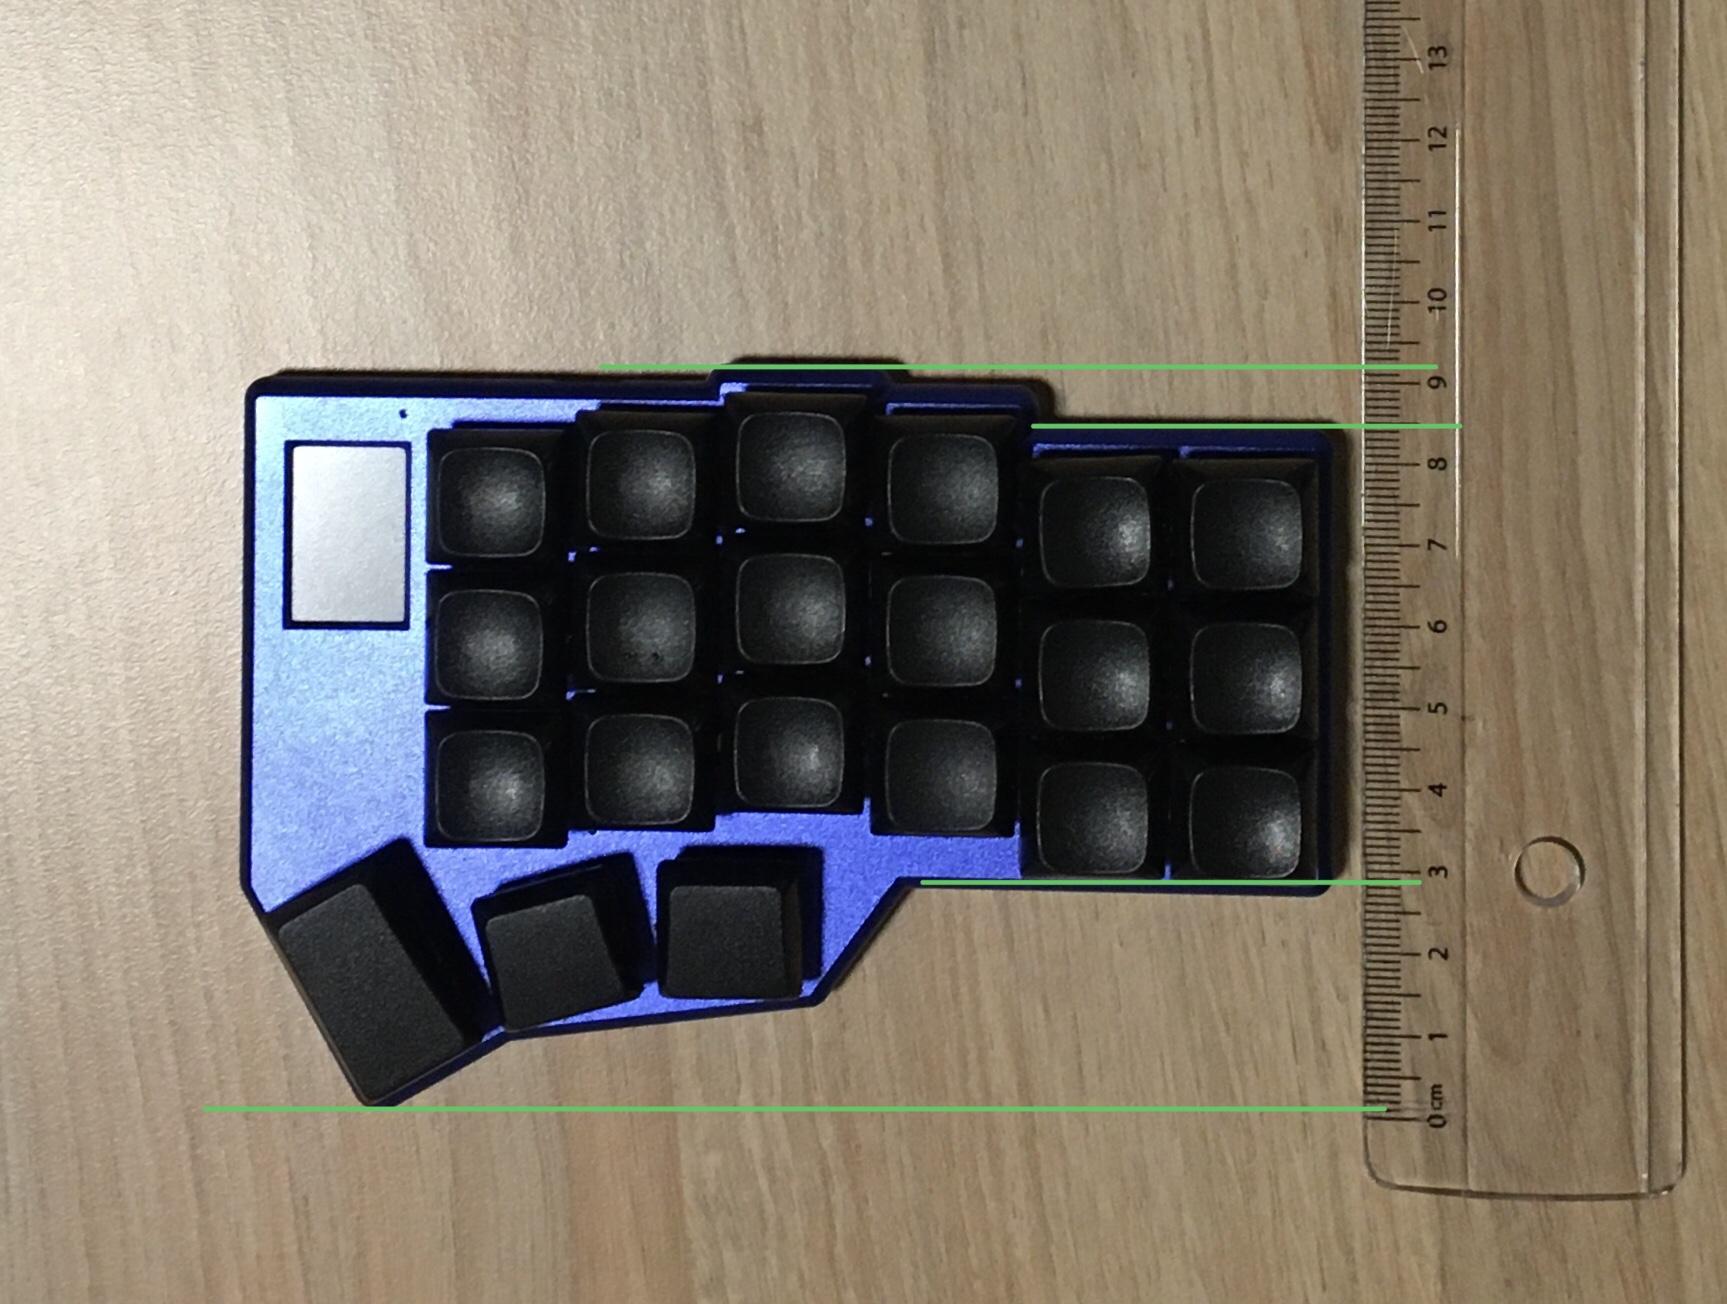
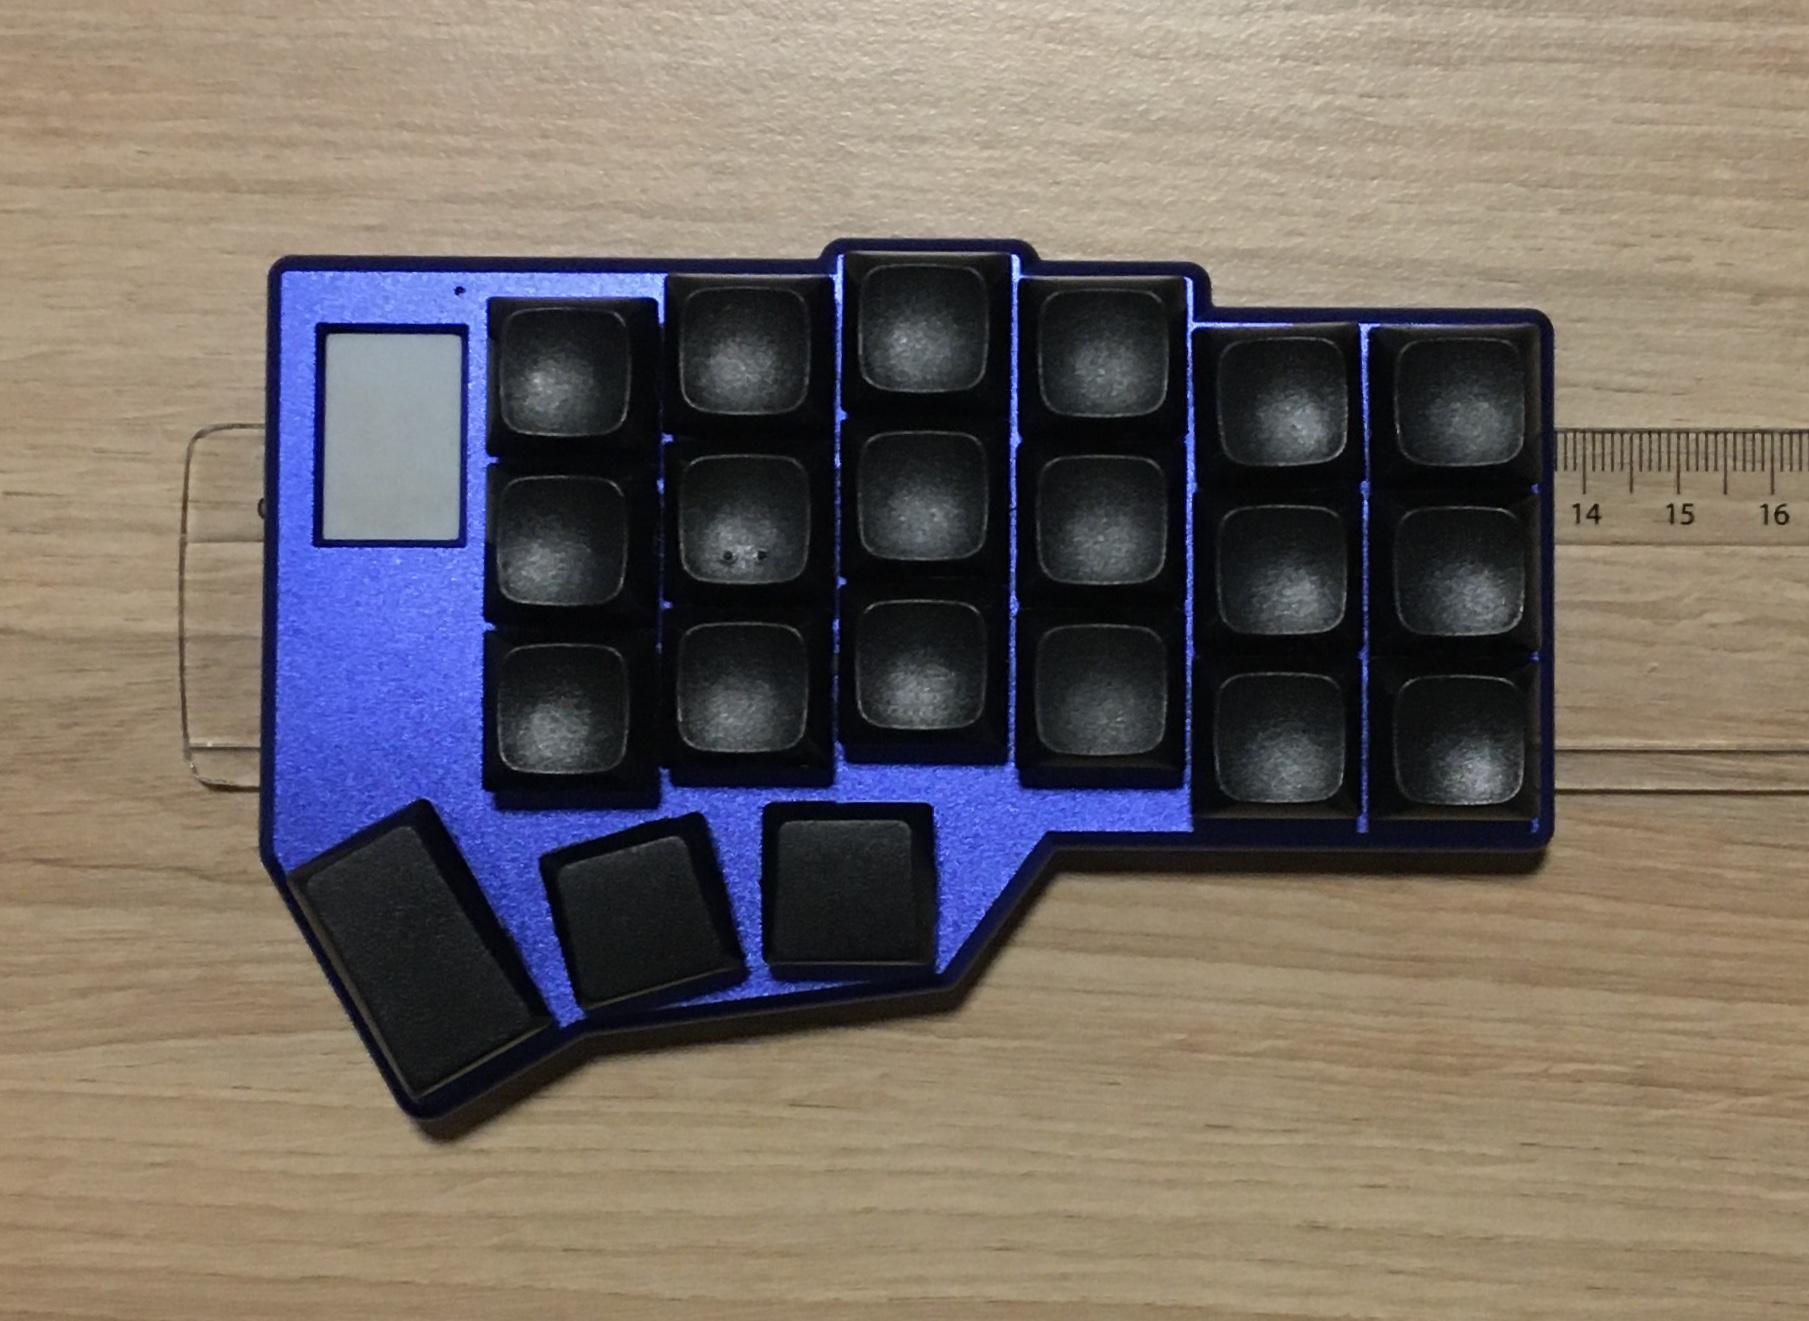
In terms of the keyboard itself, each side has 3 rows of 6 keys, arranged in a columnar layout, along with 3 thumbkeys, which are arranged in a small arc. There is a little e-ink display for showing the battery level, Bluetooth connection, and current layer. And the case is made of machined aluminium, which both looks and feels premium! Mine is a blue anodised version and I think it looks pretty good, especially when paired with black keycaps:
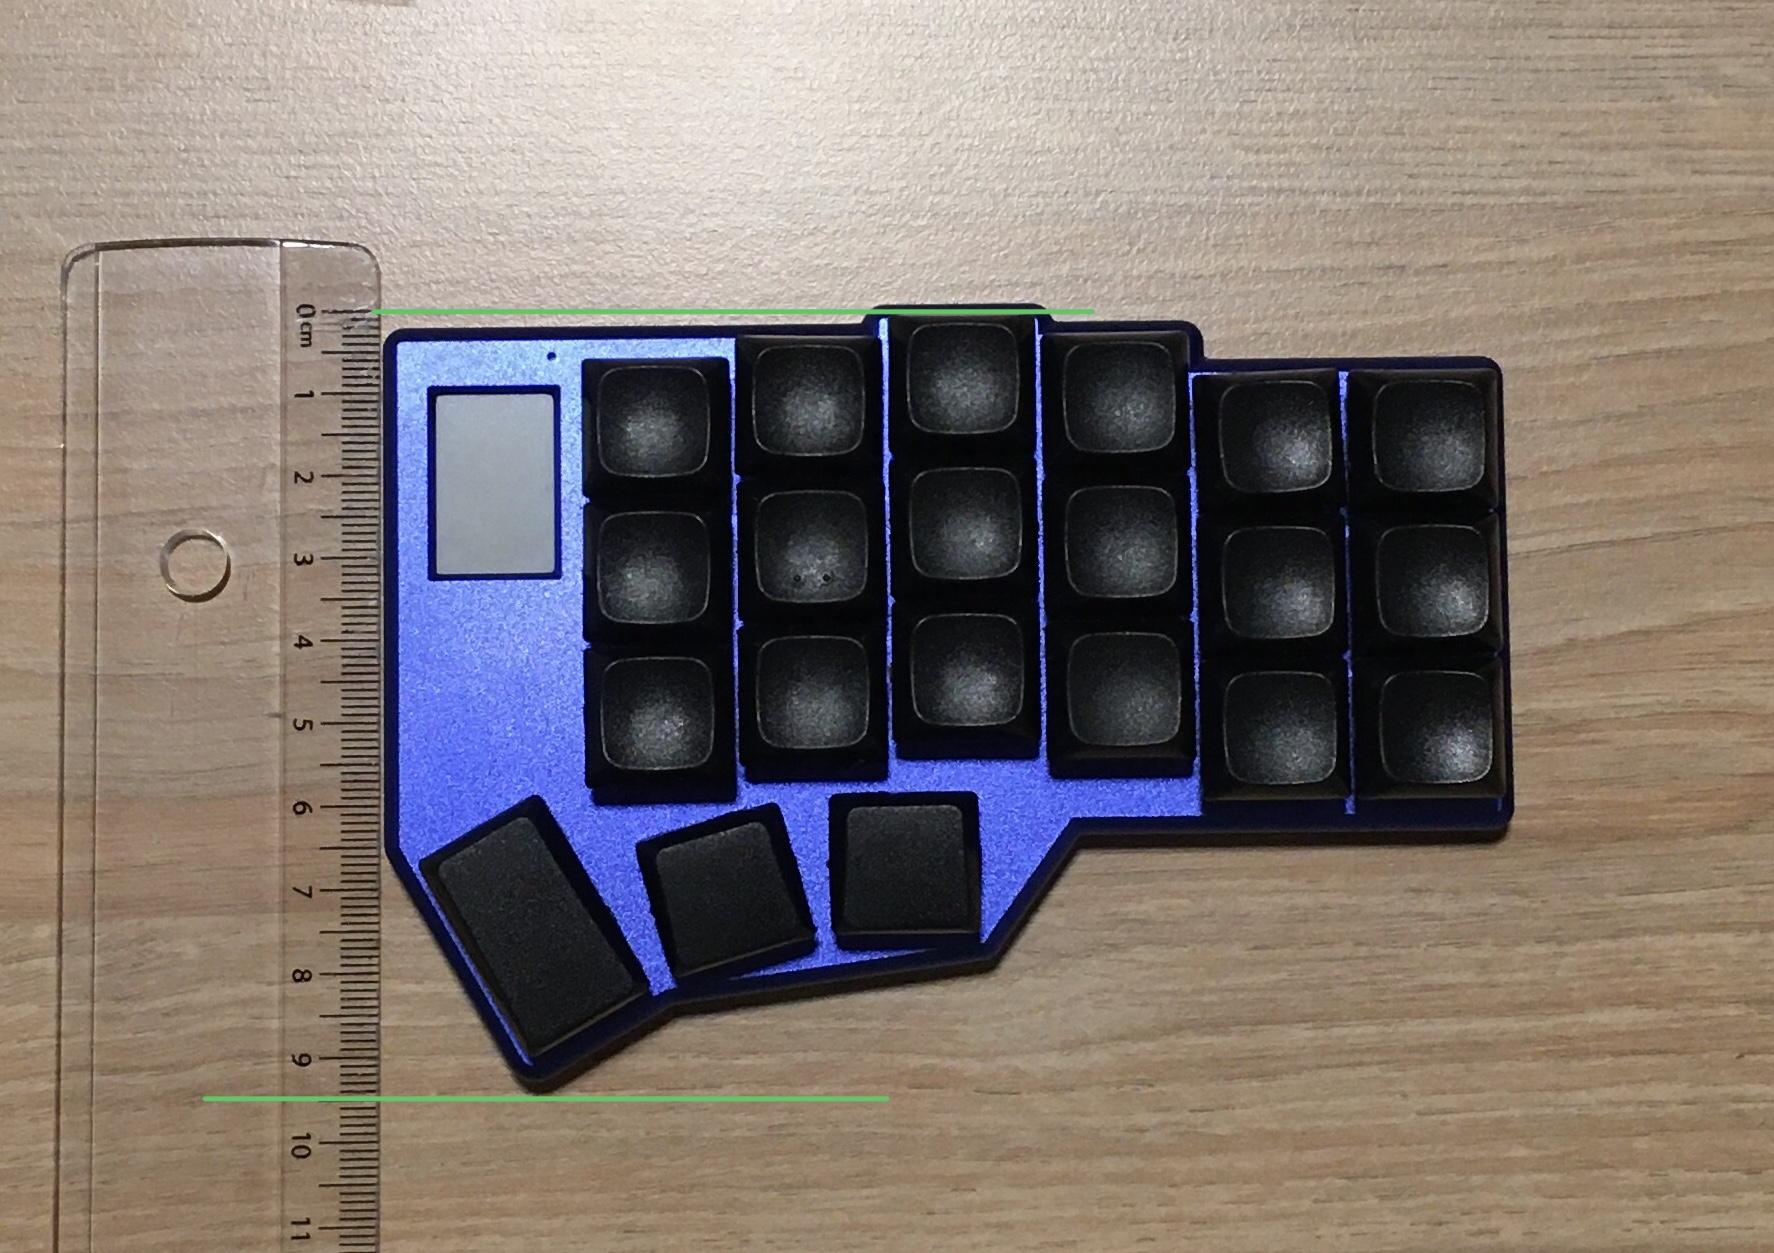
Roughly measured, the Zen’s height, length, and width is around 9.5cm, 13.7cm, and 1.9cm (1.4cm without keycaps) respectively.

And just because I was curious, I decided to weigh the board. With the carrying case, the mass is 406 grams. Total! Each side weighs only around 138 grams, which is super impressive considering the aluminium casing and that there is an entire PCB with solder and switches in there!
Configuration
As I mentioned at the start, configuration is a huge part of making a keyboard
this small useable. There are no number keys or function keys, and things like
space, Shift, Escape, and enter/return are somewhere on the thumbkeys. This
means you need to use layers.
Layers?
Layers can seem like a foreign concept at first, but I’ve found they quickly
become intuitive. On your current keyboard, you likely have at least 1, maybe 2,
layers: when you need to type uppercase letters, you hold down the Shift key,
thereby changing layers to one where the keys on the keyboard now output their
uppercase versions. And if you have a laptop, chances are that the function
keys work as either function keys or media keys (volume, brightness, etc.)
depending on whether you hold down a Fn key or not. This is also a separate
layer, just one which doesn’t affect most of the other keys on the keyboard.
So chances are you already use layers on a daily basis when interacting with a computer, you just didn’t know this functionality had a name : )
Layout
The keyboard comes preconfigured with a layout and layers out-of-the-box (ootb),
but the configuration is a default layer containing a US layout, numbers on a
second layer, and Bluetooth configuration on the final one. This is slightly
problematic because the layout I am used to is Danish, which means I have no
idea where symbols are on a US/ANSI layout. For example, on a Danish layout, ‘:’
is typed by pressing Shift + ‘.’ and ‘;’ is typed by pressing Shift + ‘,’.
So the first thing to do was to work out some layouts and layers which would
(hopefully) make sense to me.
After some experimentation, I ended up with 3 layers:
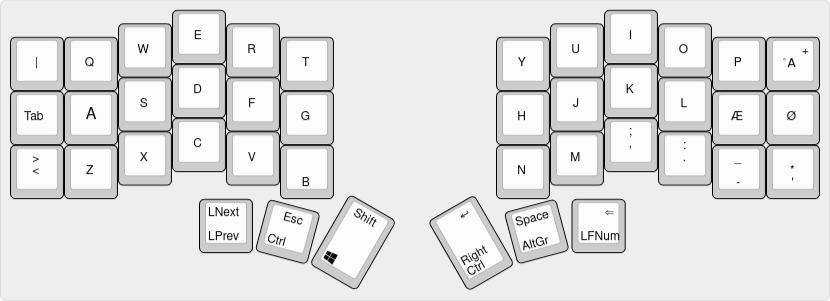
- A default layer containing the QWERTY keys, along with some tap-dances for
switching layers and some symbols I wanted more easily accessible, and
mod-taps for things like
Esc/Ctrl, space/AltGr, etc. I also created a layer-tap for backspace and my function+number layer, since it is a layer I often need to access. Which side to place the functionality on was chosen based on a combination of where I would expect to find them (muscle memory) and my current Dygma Raise layout:
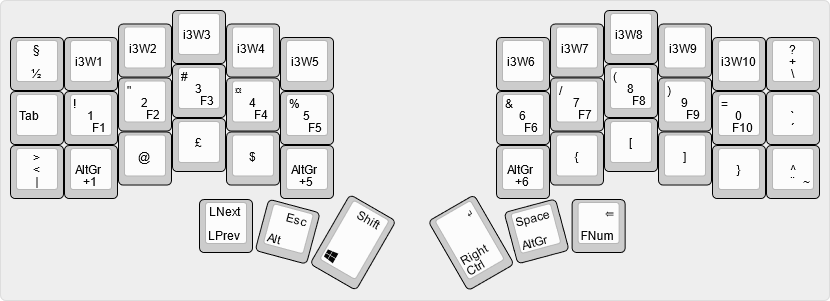
- A “function and number-keys” layer, which took a bit more work. Not making
matters easy for myself, I have become used to the i3 tiling window manager,
meaning there is some extra functionality for moving between workspaces which
I thought it would be really nice to have on dedicated keys. I ended up with
the numbers on the home row (with tap-dances for the respective
function keys), the i3 keys on the top row, and the symbols I would normally
type using
AltGr+<number> on the bottom row:
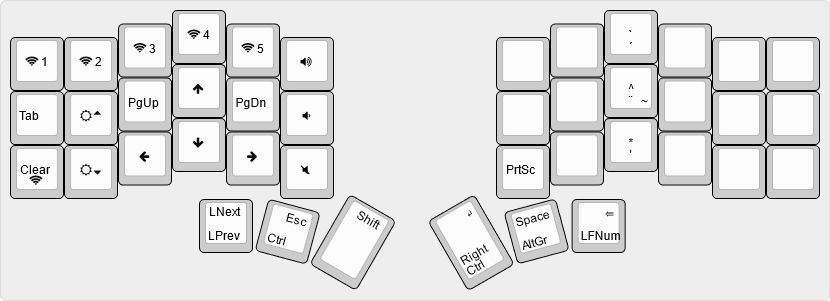
- A Bluetooth and navigation layer. The Zen is a wireless Bluetooth keyboard, and I hadn’t put arrow keys and friends anywhere yet. The Bluetooth controls ended up along the top row of my third layer, in order to make space for the media-and-navigation-keys hub on the lower two rows. The “Clear Bluetooth” button was placed in the bottom left to avoid accidental presses:
Applying the layout
Configuring the Zen’s layouts requires modifying the layout file used when
building its ZMK firmware, and then flashing the new firmware to the keyboard
(Darryl has a
video on how to do this).
It took me a bit of setting up and getting used to, but then it went okay. If
you are familiar with GitHub, GitHub Actions, and git, you’ll likely be fine.
If not, ZMK does provide an
Initial Setup Guide,
which is pretty decent. However, compared to something like Dygma’s products,
where the configuration is done via a Graphical User Interface (GUI), it is a
much higher barrier to entry. Anyway. With the keyboard configured, how is it
actually to use?
Using the Zen
The learning curve is somewhat steep. Despite being able to touch-type, and
having used a split keyboard (the Dygma Raise) for the past 2 years or so, going
from a keyboard with number-keys and the keys that normally surround the
alphanumeric ones (i.e. Tab, Esc, etc.) to a keyboard without them was a
challenge — by no means insurmountable, but it did take some effort.
The biggest problem was my muscle memory. The Raise had gotten me into this kinda limbo state where if need be, or simply by reflex, I would reach for the normal position of a key. This works on the Raise (and I think it’s one of its greatest strengths, especially since it’s meant to be an introduction to the split ergonomic keyboard world), but it very much doesn’t on the Zen. Surprisingly, I didn’t find the columnar layout to be much of a problem. There are some “bad” habits I’ve had to unlearn (like using my ring fingers for keys which technically are for the pinkies), but other than that it was fine.
Overall, I think it took me about a week, maybe 10 days, before I was comfortable typing on the Zen, and after another 1-2 weeks, I reckon I was completely back to speed. And now that I’ve learnt it, it is an absolute dream to type on! I never thought I’d say it, having previously called friends who got 40-odd key keyboards “crazy”, but like learning Dvorak or thumbkeys, it is extremely comfortable to only use 3 rows! Which I guess makes sense: keyboards tend to be uncomfortable because we constantly stretch our fingers to reach for faraway keys. Remove everything but the 3 central rows, and you’ve got very little to reach for, simple as that ^^
(As an unexpected and slightly funny side-effect, I’ve gotten almost too used to there only being 3 rows and find myself trying to type numbers with the home row and spacebar on my laptop)
That’s not to say that the Zen is without shortcomings. When I’m doing long
programming sessions, I find myself struggling to rapidly mix letters and
numbers in my typing. Tap-dances also occasionally get in the way, for example
the numbers vs function keys is all well and good, until I need to type two
ampersands (which are Shift + ‘6’ on a Danish layout) but end up summoning
Shift + F6 instead. Some symbols like ‘~’ and ‘|’ can also be annoying to
quickly retrieve. This is possibly a sign that I need to rework my layers,
but that’s more effort than I can be bothered to put in right now; it works
well enough.
Another problem I have is that I also do a lot of programming in Vim (only
half-self-inflicted suffering, it is the best supported editor for the language
I’m working on). In Vim, slightly more involved commands like z=, y5}, or
ci( become difficult when the numbers and symbols are on a separate layer.
As with programming, any character-number-character rhythm just doesn’t seem to
flow quite as smoothly.
Is it all worth it?
I would definitely say so. The portability of the Zen cannot be understated, and the weight it has removed from my backpack is almost worth it alone! Having some things occasionally be a bit slower is then a trade-off I’ll happily make in exchange for lugging less around; my shoulders are very grateful. I was slightly worried about the battery life, but so far they’ve always lasted me at least the week, and often into the next one. The left half does twice the communication (with the PC and the right half), so it needs charging slightly more frequently than the right half, but thanks to the e-ink displays, I’ve never been caught out by the battery suddenly being dead. The learning curve and configuration process are more difficult than “standard” ergonomic keyboards, but I think it is okay, especially for the benefits.
Overall, it is a premium-looking, premium-feeling, useable 42-key programmable keyboard, and I’m very happy with it!
Thomas Ekström Hansen
PhD student in Computer Science
My interests include information visualisation, formal methods, and low-level programming.